Tuesday 17 January 2017

Get your Raspberry PI to Read Out your Text Messages using IFTTT

Continuing the theme of talking Raspberry Pi's from my recent posts (Get your RPi to Speak the News and Turn your RPi into a Amazon Echo like device), using the brilliant service IFTTT (If This Then That), I've created a way the my Raspberry Pi reads out a notification whenever I receive a SMS on my (android) mobile phone.

If you don't know what IFTTT is, wikipedia calls it :

IFTTT is a free web-based service that allows users to create chains of simple conditional statements, called "applets", which are triggered based on changes to other web services such as Gmail, Facebook, Instagram, and Pinterest. IFTTT is an abbreviation of "If This Then That".

The below shows the sequence of events of how information regarding a SMS received on your phone ends up on the Raspberry Pi.


In IFTTT, you create an "applet",  which fires a trigger when an SMS arrives on your phone, it then sends this info to the central IFTTT service which then performs an action you select. This action could be to turn on light using something like WeMo or Phillips Hue, or adding a row in a Google Sheet, or even sending a Gmail. But in this case the action is to send a webrequest to my raspberry pi.  The web request is handled by some PHP code using JSON , which reads the info send and then executes

Please note I am using the Android SMS trigger on IFTTTT. There doesn't seem to be an equivalent for IPhones

So what do you need to set this up:

1. Setup your Pi as a Webserver

The below 3 steps are covered on the site: http://www.penguintutor.com/linux/light-webserver
  • Raspberry Pi running a web server such as lighttpd
  • Have a fixed IP or use a dynamic dns service such as noip.com to you have a URL which connects to your Raspberry Pi . You may also need to setup your home router to forward incoming http requests to your Raspberry Pi
  • Install PHP to right server side code to handle IFTTT actions and/or to run other web applications you may want to write. 
2. Setup Script to execute Text to Speech 
3. Setup PHP page to handle request 

  • Create a file readSMS.php in your /var/www  directory (this is the default for lighttpd) with the following content :


if ($_SERVER['REQUEST_METHOD'] == 'POST')
{

   $data = file_get_contents("php://input");

 //Removes all 3 types of line breaks
 $data = str_replace("\r", " ", $data);
 $data = str_replace("\n", " ", $data);  

 $result = json_decode($data, true);

 $myfile = fopen("readSMStest.txt", "w") or die("Unable to open file!");
 fwrite($myfile, $data);


 $strText = "SMS received from " . $result['contact'];
 fwrite($myfile,"\n" .$strText);
 fclose($myfile);

 $strCommand = "sudo /home/pi/Documents/speech.sh" . " " .  $strText ; 

 exec($strCommand, $command_output);

 foreach($command_output as $line) :

  echo $line  ;

 endforeach;

}

?>

  • This code reads the input from an HTTP Post (we will setup IFTTT later to send an http post request) , decodes the JSON sent by IFTTT, and extracts the contact name of who sent the SMS to your phone. It then executes the speech.sh script which you should have set up from the previous step. 
  • You may need to change the $strCommand string to the location of where you saved the speech.sh file
  • The script also for debugging purposed writes a text file readSMStest.txt to the same folder
  • The above can be downloaded from:

4. Create Applet in IFTTT

  • Sign up to IFTTT and download the app to your phone 
  • In the IFTTT site click on My Applets then on the New Applet button
  • You will see the below Applet Maker, click on the "+ this" to setup the trigger (which is any SMS received)


  • Start typing "android" and then click on "Android SMS"
  • Now click on "Any new SMS received"

  • Now click on "+that" to setup the Action
  • Start typing "maker" and select the "Maker" action service. 
  • Click on "Make a web request"
  • Fill in the web request as below:
    • Change the URL to the address of your webserver. 
    • The JSON Body Text is below which is easier to copy and paste. This sends the info about your SMS message to your php page using JSON
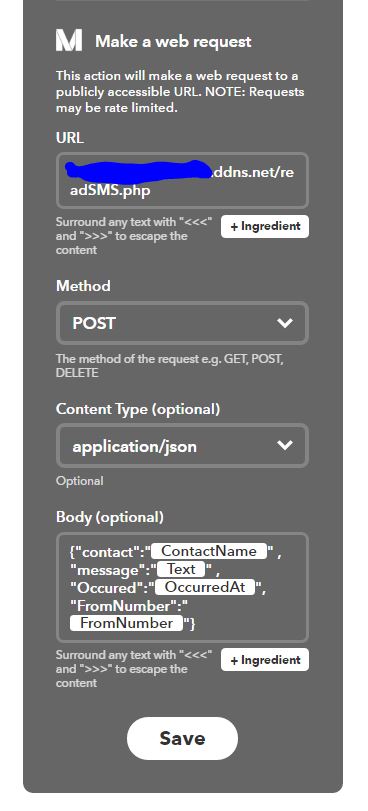
    • {"contact":"{{ContactName}}" , "message":"{{Text}}" , "Occured":"{{OccurredAt}}", "FromNumber":"{{FromNumber}}"}
      

  • Hit Save and you're done 
  • You can rename the Applet to whatever you want, and can toggle whether you want logging

5.Test it out

Now all you need to do is test it out. Get somebody to send you a text or send one to yourself and hopefully you should hear your Raspberry PI (remember to turn on the speakers and volume is up) say "SMS received from" and then the name from your address book

6.Customise it

Now you can tailor this to do whatever you want. Maybe read out the full message, or use one for the other triggers. Or maybe get your php page to perform some other action like turning on lights


Hope the above is helpul. Any problems , please leave something in the comments.


Wednesday 11 January 2017

Building an Amazon Echo Like Device with a Raspberry Pi and Google Cloud Speech Api

In my previous post I showed how I wrote a python script to read out the latest news headlines using Googles text to speech api.  As I commented in that post, voice recognition and talking devices seem to be the in thing with the release of the Amazon Echo and Google Home.

In this post I show how I created a python script to record sound on your raspberry pi, invoke the google cloud speech api to interpret what was said, and then perform a command on your raspberry pi - so a bit like a basic Amazon Echo.

Setting up your mic

Before I get into the python code, you need a mic setup. As the Raspberry Pi does not have a soundcard you will need a USB mic or a webcam which has an inbuilt mic. I went for the latter and used a basic webcam from logitech.

Once you have your mic plugged in, follow the instructions in the "Step 1: Checking Your Microphone" in: https://diyhacking.com/best-voice-recognition-software-for-raspberry-pi/

Install prerequisites

There is one python library you need which is pycURL, which is used to send data to the Google Cloud Speech Api. Follow the instructions here: http://pycurl.io/docs/latest/install.html

You will also need to install SoX which is an opensource tool to analyse sound files. This is used in the script to detect whether any sound is on the recorded audio, before trying to send it to the google api.

You can install this by running:

 sudo apt-get install sox

One more thing to install, flac . Flac is used to record your sound file in a lossless format which is required by the google api:

You can install this by running:


 sudo apt-get install flac

Setup Google Cloud Speech Api

To do the voice to text processing I am using the speech api which is part of Google Cloud. It is in beta at the moment and offering a free trial.

Follow the instructions on the their site to get your api key which will be needed in the script:

The current downside I've found with this api is the latency. It's currently taking 5-6 seconds for a response to process a 2 second audio file. The google help files yes the response time should be similar to the length of audio being processed. 

Python Script

Now to the actual python code. 

All the files required can be downloaded from here:


The main file to look at is speechAnalyser.py.

This script does the following:

1. If no audio is playing (you don't want to record if you're playing something on your speakers), records sound from your microphone for 2 seconds
2. Uses SoX to check if any sound is on the file and is above a certain amplitude - this helps to not bother processing when there is silence or just background noises
3. If there is sound at a sufficient amplitude, then send the audio to the google api with a JSON message. As said earlier the google api takes a 5-6 seconds and returns a JSON message with the words detected.
4. If the trigger word in this case "Jarvis" is said during these two seconds, a beep sound is played.
5 Records another 3 seconds to listen for a user speaking a commandand sends to the google api like step 3
6.Checks if keyword found in returned text and executes the appropriate command. For example if "news" is mentioned it invokes the GetNews script which I described in my previous post.
7. Loops back to Step 1. 

Remeber to change the line below where it says with the key which was provided when you set up the Google Cloud Speech api


key = ''
stt_url = 'https://speech.googleapis.com/v1beta1/speech:syncrecognize?key=' + ke

Also you should customise your commands in the following section of code:

def listenForCommand(): 
 
 command  = transcribe(3)
 
 print time.strftime("%Y-%m-%d %H:%M:%S ")  + "Command: " + command 

 success=True 

 if command.lower().find("light")>-1  and  command.lower().find("on")>-1   :
  subprocess.call(["/usr/local/bin/tdtool", "-n 1"])
   
 elif command.lower().find("light")>-1  and  command.lower().find("off")>-1   :
  subprocess.call(["/usr/local/bin/tdtool", "-f 1"])
 elif command.lower().find("news")>-1 :
                os.system('python getNews.py')

  elif command.lower().find("weather")>-1 :
                os.system('python getWeather.py')
 
 elif command.lower().find("pray")>-1 :
                os.system('python sayPrayerTimers.py')
 
        elif command.lower().find("time")>-1 :
                subprocess.call(["/home/pi/Documents/speech.sh", time.strftime("%H:%M") ])
 
 elif command.lower().find("tube")>-1 :
                 os.system('python getTubeStatus.py')
 else:
  subprocess.call(["aplay", "i-dont-understand.wav"])
  success=False

 return success 

The other interesting part of the script to look at is, where it sends the data over to the Google Cloud Speech Api.

It creates a JSON message, and then encodes the audio in base64.

Within the outgoing JSON message, there is a phrases section, where I've included my trigger word "Jarvis", which makes it more likely the speech engine recognises this

The final bit then gets the text from the response.


#Send sound  to Google Cloud Speech Api to interpret
 #----------------------------------------------------
 
 print time.strftime("%Y-%m-%d %H:%M:%S ")  + "Sending to google api"


   # send the file to google speech api
 c = pycurl.Curl()
 c.setopt(pycurl.VERBOSE, 0)
 c.setopt(pycurl.URL, stt_url)
 fout = StringIO.StringIO()
 c.setopt(pycurl.WRITEFUNCTION, fout.write)
 
 c.setopt(pycurl.POST, 1)
 c.setopt(pycurl.HTTPHEADER, ['Content-Type: application/json'])

 with open(filename, 'rb') as speech:
  # Base64 encode the binary audio file for inclusion in the JSON
         # request.
         speech_content = base64.b64encode(speech.read())

 jsonContentTemplate = """{
    'config': {
         'encoding':'FLAC',
         'sampleRate': 16000,
         'languageCode': 'en-GB',
   'speechContext': {
        'phrases': [
         'jarvis'
      ],
     },
    },
    'audio': {
        'content':'XXX'
    }
 }"""


 jsonContent = jsonContentTemplate.replace("XXX",speech_content)

 #print jsonContent

 start = time.time()

 c.setopt(pycurl.POSTFIELDS, jsonContent)
 c.perform()


 #Extract text from returned message from Google
 #----------------------------------------------
 response_data = fout.getvalue()


 end = time.time()
 #print "Time to run:" 
 #print(end - start)


 #print response_data

 c.close()
 
 start_loc = response_data.find("transcript")
     temp_str = response_data[start_loc + 14:]
 #print "temp_str: " + temp_str
     end_loc = temp_str.find("\""+",")
     final_result = temp_str[:end_loc]
 #print "final_result: " + final_result
     return final_result


I have to give a big shout out to the following sites which gave me ideas on how to write this script:

https://diyhacking.com/best-voice-recognition-software-for-raspberry-pi/ - This contains the instructions on how to setup a microphoen on the raspberry pi
https://github.com/StevenHickson/PiAUISuite - Full Application which does what the above script does but is configurable. But not sure if it still works with the new Google Speech Api

Thursday 15 December 2016

Get your Raspberry Pi to Speak the News


Talking devices are the in thing at the moment with the Amazon Echo and the newer Google Home, so I thought I would try to get my raspberry pi to read out the news.

Here's what you need to do:

1, Install mplayer (audio player) on your raspberry pi
2. Setup a script to invoke Google Translates text to speech engine
3. Create a Python Script to pull the latest headlines from the BBC rss feed and then read them out
4. Add the script as a cron job to run every hour

Below is the detail behind each step

1. Install mplayer on your raspberry pi

(The below instructions are based on http://elinux.org/RPi_Text_to_Speech_(Speech_Synthesis))

a. First you will need to update Raspian (this can take up to an hour if not run in some time)

sudo apt-get update
sudo apt-get upgrade

b. Add sound utilities

 sudo apt-get install alsa-utils

c. Edit the follow file with the line

sudo nano /etc/modules

to have line

 snd_bcm2835 

d. Install mplayer

sudo apt-get install mplayer

2. Setup a script to invoke Google Translates text to speech engine

a. Create a file call speech.sh with the following content:


#!/bin/bash
say() { local IFS=+;/usr/bin/mplayer -volume 100 -ao alsa -really-quiet -noconsolecontrols "http://translate.google.com/translate_tts?ie=UTF-8&client=tw-ob&q=$*&tl=En-us"; }
say $*


b. Add execute permissions to the script

chmod u+x speech.sh

c. Test it out


./speech.sh Hello I can talk

Remember you will need speakers plugged into your raspberrypi to hear anything!

3. Create a Python Script to pull the latest headlines from the BBC rss feed and then read them out

a, Install feedparser which is a python libararyto read RSS feeds. Follow the instructions from the below link:

https://pypi.python.org/pypi/feedparser#downloads

b. Create a file getNews.py with the following content


##!/usr/bin/env python

import subprocess
import feedparser
import time 


d = feedparser.parse('http://feeds.bbci.co.uk/news/rss.xml?edition=uk')

introMessage = "BBC News Headlines at " + time.strftime("%H:%M") 

subprocess.call(["/home/pi/Documents/speech.sh", introMessage])

maxItems = 3
itemCounter = 0 

for post in d.entries:
        print post.title
 subprocess.call(["/home/pi/Documents/speech.sh", post.title])
 itemCounter = itemCounter + 1
 if itemCounter == maxItems:
  break

Remember to change the location to where you saved speech.sh
Also change maxItems if you want the script to read out more than 3 headlines. 
You could change the link to another news website of your choice as long as they provide a rss feed.

c. Test the file


python getNews.py

You should hear the top 3 headlines read out

4. Add the script as a cron job to run every hour (or how every frequently you want)

a. Open crontab with:

crontab -e

b. Add the line


@hourly python /home/pi/Documents/getNews.py > /dev/null 2>&1


Check out the following site on how to set up cron jobs if not familiar:
http://www.howtogeek.com/101288/how-to-schedule-tasks-on-linux-an-introduction-to-crontab-files/


And there you go, you now have a news reading speaking rasperberry pi. You could adapt this to read out any other type of site which uses rss feeds.

The following files can be downloaded from the links below:

getNews.py
speech.sh


Wednesday 24 July 2013

Turn your Raspberry Pi into an Azaan/Prayer clock


Recently I've been playing with the raspberry pi and given it's Ramadan, I thought I'd see if I could turn it into an Azaan (Islamic call to prayer) clock. Given the RPI is low powered I can leave it on and it doesn't need a monitor, keyboard, mouse, etc plugged in.

This is what I did:

1. Plug in a speaker into the 3.5mm audio output on the raspberry pi

2. Download python code from prayTimes.org to calculate prayer times

3. Download azaan mp3 from prayTimes.org again.

4. Write a python script to set jobs in crontab to play the azaan mp3 at the appropriate time (see code below or download here). The python code from prayTimes.org has to be in the same folder for this to work.

My script utilizes the python crontab library. More info on setting this up available on the links below

Python crontab: http://pypi.python.org/pypi/python-crontab/
Installing modules: http://docs.python.org/2/install/index.html

The bits you may need to configure yourself are:

a) Longitude and Latitude (currently set to London UK)
lat = 51.5171
long = 0.1062

b) Timezone (currently set to 0+GMT and daylight savings =1 )
times = PT.getTimes((now.year,now.month,now.day), (lat, long), 0,1) 

c) Location of azaan mp3:
strPlayAzaanMP3Command = 'omxplayer -o local /home/pi/Downloads/Abdul-Basit.mp3 > /dev/null 2>&1'

The code from prayTimes.org is really configurable, so you can change the prayer time calculation method and a whole load of other adjustments. 

5. Add a job in crontab to run this script on a daily basis to update the azaan times:

# m     h       dom     mon     dow     command
0 1 * * * python /home/pi/Documents/updateAzaanTimers.py > /dev/null 2>&1

6. You're done. For each prayer , the raspberry pi will play the azaan mp3 via the speaker.

For All code and audio files I've used/written are available on the link below:
https://www.dropbox.com/sh/r0e787digng1rgv/OmCXiu9Vx_/RPi%20Azaan%20Clock


#!/usr/bin/env python

import datetime
from praytimes import PrayTimes


#Get Prayer Times
#--------------------
lat = 51.5171
long = 0.1062

now = datetime.datetime.now()


PT = PrayTimes('ISNA') 
times = PT.getTimes((now.year,now.month,now.day), (lat, long), 0,1) 

print times['fajr']
print times['dhuhr']
print times['asr']
print times['maghrib']
print times['isha']


#Update Crontab with Prayer Times
#---------------------------------

from crontab import CronTab


#Function to add azaan time to cron
def addAzaanTime (strPrayerName, strPrayerTime, objCronTab, strCommand):

  job = objCronTab.new(command=strCommand,comment=strPrayerName)
  
  timeArr = strPrayerTime.split(':')

  hour = timeArr[0]
  min = timeArr[1]

  job.minute.on(int(min))
  job.hour.on(int(hour))

  print job

  return


system_cron = CronTab()

strPlayAzaanMP3Command = 'omxplayer -o local /home/pi/Downloads/Abdul-Basit.mp3 > /dev/null 2>&1'

jobs = system_cron.find_command(strPlayAzaanMP3Command)

print jobs

for j in jobs:
  system_cron.remove(j) 

addAzaanTime('fajr',times['fajr'],system_cron,strPlayAzaanMP3Command)
addAzaanTime('dhuhr',times['dhuhr'],system_cron,strPlayAzaanMP3Command)
addAzaanTime('asr',times['asr'],system_cron,strPlayAzaanMP3Command)
addAzaanTime('maghrib',times['maghrib'],system_cron,strPlayAzaanMP3Command)
addAzaanTime('isha',times['isha'],system_cron,strPlayAzaanMP3Command)


system_cron.write()


Thursday 4 November 2010

Fix when Android Market cannot download


On my G1 running Android 1.6, I started to have problems with the Android Market. Any application that I tried to update or install resulted in an error message saying that the download was unsuccessful.

Luckily with a bit of googling, this is what I did to resolve the problem

1. Open Settings
2. Select Applications
3. Select Manage Applications
4. Select Market and the select Clear Cache
5. Repeat step 4 and clear the cache for Google Apps, Google Talk and Checkin Service.
6. Restart your phone

When you open the market it will ask you to login to your google account with your username and password. Once logged in , you will be able to download  and update apps.

These instructions are based on:
http://www.technipages.com/android-market-download-unsuccessful-error-fix.html

Thursday 5 August 2010

Install Flash in Google Chrome Portable without Admin Rights

If you need to install Chrome and you don't have admin rights on your windows machine, then the best thing to do is to use a portable version, available from portableapps.com :

http://portableapps.com/apps/internet/google_chrome_portable

You can put this anywhere on your machine or even on a usb stick.

However if you want to use sites like youtube or google streetview, you will need Adobe Flash Player. As you don't have admin rights you will not be able to run the standard abobe installer.

This is what you need to do instead:

1. Download this file from Adobe: http://fpdownload.macromedia.com/get/flashplayer/xpi/current/flashplayer-win.xpi

2. Rename the file extenion from .xpi to .zip

3. Use an unzip program like winzip or 7-zip to extract the contents

4. Copy the files flashplayer.xpt and NPSWF32.dll from the contents of the zip to the folder \App\Chrome-Bin\5.0.375.55\Plugins

This will be where you installed Google Chrome and the 5.0.365.55 folder might be named differently.

5. Restart Chrome and enter this in the address bar: about:plugins . You should see Shockwave Flash listed as a plugin.

6. Try out youtube.com

These instructions are kind of based on:
http://eurekatips.com/2009/05/05/flash-google-chrome-manual-permission-portable/724/

Friday 23 July 2010

Run a command and read console output in VB6 / VBA

Needed to run a command line program from code and read the input. Found this useful code to do it: